Saturday, March 28, 2009

You shall have your Proof!


I cracked up at Diana Moll's comment on my last post. She spurred me on to finish the block and pull a proof before I called it a night! The proof is definitely a proof. I purchased some burgandy/wine colored paper for the book covers but the gold dust is still the shade that I will be using. This chinese red color is just a piece I had laying around. The color is okay but way too obvious for me. I didn't want to use a bright red because the chinese dragons would imply a "chinese restaurant feel" to me. It's definitely firey!

Here is the block locked up on the press bed ready for a slathering of ink. I couldn't decide whether or not to use a tinted ink or just tint base. I have decided for the books to just go with tint base. The colored paper is so dark that it will not be necessary to use any of my pigments for a "back up color".

Here is the print fresh off the press. The sticky tint base really shows.

Now we get to play in the gold dust! Static in the air really carried the particles so I'll need to don a face mask when I get ready for the real deal.
Pretty good for a days work I would say. Now if you'll excuse me, I'm finding it hard to type as my vermouth spiked peach cider is inhibiting my typing capabilities! Going to go pass out in bed now and dream of dragons dancing in flames...

Tuesday, March 24, 2009

Two Dragons One Pearl


I started this little number while I carve the Limulus block. When I get tired of carving wood I begin to pluck linoleum and visa versa. This project is also a farmer's market venture. I LOVE books with beautiful covers depicting mysterious places and curious things and I am hoping that someone else will too. I have decided to design three book covers for journals that capture this enthusiasm and go further if the market allows. They will all be key block images that will be inked up in tint base and then dusted with gold or silver powder to create a gilded look. I have a deep red paper for this image and it will be dusted in gold. I'm also excited to use my Vandercook for this. I LOVE using my presses. This block image has given me some relief from the Limulus print as I'm starting to go stir crazy with the DNA and geometrical stars. The repetition is mind numbing and I have a feeling it has contributed to my recent clumsiness. The organic shapes of the twisting dragons with their snarling teeth and liquid flames and helped relieve my brain of the monotony in the Limulus border. I can't wait to finish it and proof it up!

Sunday, March 22, 2009

The Weasel will seek any way in....


Ah, the time honored tradition of artists seeking any means to subsidize their income....
Our local Farmer's Market in Charlottesville, VA is ready to start up in April and I would like to try to get in on it to experience what it is like! I learned a good deal from the "Holiday Market" that they held last this past winter on the downtown mall. Lesson number one: I hate cold weather. Lesson number two: People generally don't understand what a block print is or what printmaking entails. I didn't give the Holiday Market a fair try as I only sat for one day but sitting outside all day in the freezing cold on the advent of a snow storm with a total of two customers was not my idea of success. I am looking forward to the summer market though because I love sunshine and fresh vegetables! People didn't really know how to approach my stand with prints and framed works in the winter. They sort of treated it like a gallery and viewed the work and made comments but no real interest in sales. For this summer market I'm focusing only on "pedestrian" materials like journals, cards, and such. To begin with there will be only two products for sale just to see how things go. Those two products will be "Upcycled Cork Stamps" and "Hard Bound Journals".
I completed the display for some cork stamps that I made yesterday. It was so much fun to get this project together! I collect corks from bottles of wine that we drink over time and I had collected 28 before I really knew what I wanted to do with them. I designed a simple box template that I stamp my information on the front of and a sample image of the completed stamp on top. After I complete an image, I stamp it on the top of the box and in my "Stamp Morgue" book to record its existence and then wrap it in tissue paper and stuff it into the little box to await a new owner! I had made a small box full of them and could foresee that lining them up on a flat table was not my idea of successful display....especially if the wind kicked up. I sat down and sketched out a rudimentary design for a vertical display stand and set about assembling it out of odds and ends of foam core and cardboard that I had ferreted away over time. After much tweaking an adjusting, I covered the whole thing in glue soaked craft paper. The boxes fit perfect and reminded me a lot of old country store displays with their lithograph label boxes and sparkling bottles of tinctures! I had a cork stamp that I had carved a few months ago that I fell in love with and I set about stamping out little birds to paste all over the box so that it would still look good after the products were sold! I will also be bringing the stamp with me to show people what it looks like and how well they work. I made the sign out of different papers I liked and hand wrote the script. The sign detaches so that it will travel better. I will say that I just know that after sitting in the sun the nice bright colors will fade but at least I have a photo record of what it looked like. I hope that when I do get out there that I will see all those little birds I pasted onto the display by the time I leave!

Wednesday, March 18, 2009

On and on...


Yep, still chipp'n away at the horse shoe crab block. I think I got a little "factory fever" with the repetitive carving of the stars and DNA patterns. Before I knew it, I had screwed up major bad. I was habitually plowing through the end section of the longer side of one of the DNA strands and went right into my star pattern without realizing what I was doing. Lesson: If you're tired, stop carving. Anyway, I don't know why I tried to fill in such a large hole with wood filler but I did. I knew as I locked the studio door that night that it was a stupid idea. I even lay awake that night thinking that it wouldn't work and I was just going to have to go in and fix it. Yes, I lay awake and think about these things. Anyway, I came in and made this plug for the wound. I admit I initially tried to carve into the filler and it crumbled just as I anticipated. Normally, a plug would be wedged into the shaped hole in a block and then leveled off but because this is a piece of shit plywood board I had to hand carve and sand a small plug of shina plywood. It actually worked great (or so I think until I proof it up!). By the way, I tried out a new brand of wood filler, Elmer's, instead of Dap. Yeah, that stuff is crap. It just doesn't haven't the body I'm looking for so I guess I'll be heading into the hardware store to get more Dap.

Using crap wood is always an interesting adventure. In one of the Kirin blocks, I was carving along and found area of glitter plastered in between the layers of plywood. Here is a curious stain at the top of the block. It was probably a marker of some sort as the wood made its way to lamination. Some areas are just a straight up pain in the ass:

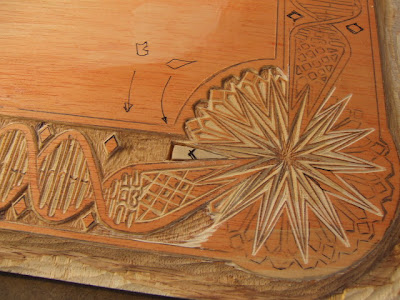
This is a rather large strip of black striations in a layer of the plywood. The wood gets tough and brittle in these areas and I find I have to hone the knives more frequently than usual. That white patch is the wood filler that had to be plastered into an area that just wasn't there at all. Holes are always a pain. Water can get in and spread who knows where in your image to create rot or the pressure from printing can even cause "sink holes" in your image.

Lastly, when an area is "finished" I brush on some watered down wood glue to shore up the weak wood. I'm beginning to wonder if this is the best idea as it will affect the absorption of water during the printing process but I really have no choice. If I don't do something to shore up all the detail, I feel that the block will degrade before I even finish pulling color proofs. Either way, there is more than one way to skin a cat. If it refuses to print moku hanga style, I have a can of oil based ink and a brayer at the ready!